#
Unity plugin

This section will cover some of the features of the Unity plugin in a little more detail. To understand the basic concepts, please read the getting started guide first.
#
Contents
Main window Settings window [BEAM]Manager Beam Unit scripts
#
Main window
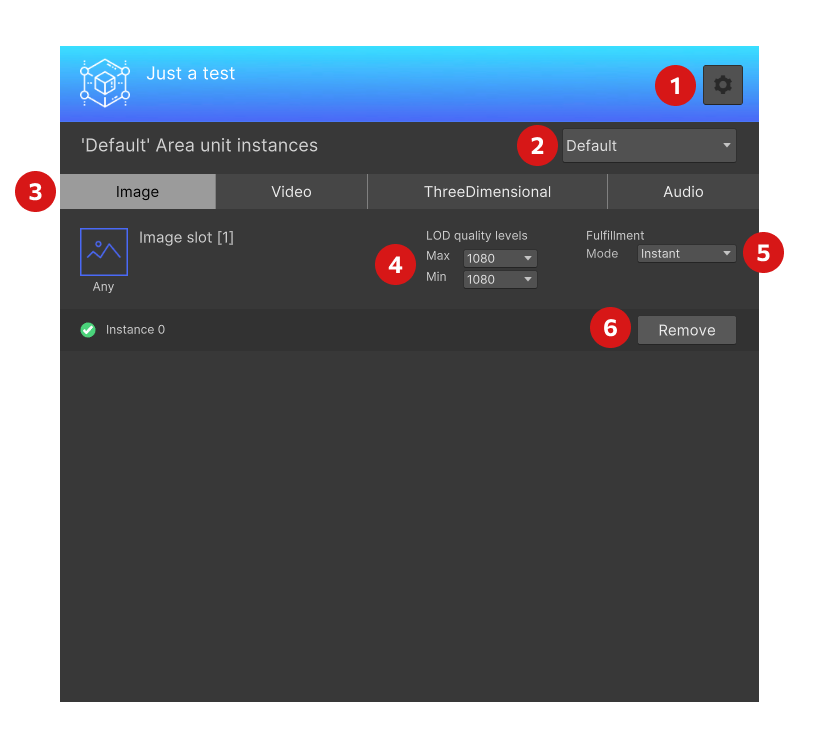
- Opens the
Settings window - Changes the selected area (not in use in Alpha version)
- Changes the type of Slot you are placing
- Changes the min and max quality of Asset to be delivered (not in use in Alpha version, do not change this from the default)
- The fulfillment mode for this Slot. The choices are
- Instant - Will be fulfilled as soon as your experience starts
- Range - Will be fulfilled when the Game Object with the
Main Cameratag comes within the range set - Manual - Must be fulfilled programatically via code by calling
BeamClient.StartManualFulfillment, passing in the reference to theBeamUnitInstancescript attached to the slot you want to fulfill.
- Add or remove the instance from your scene. It will be created at the position and rotation of your currently selected Game Object
An instance is one copy of the slot. In the full version you can have multiple instances to ensure you get the same Asset fulfilled for every copy, for example if you wanted 6 of the same chair around a table.
#
Settings window
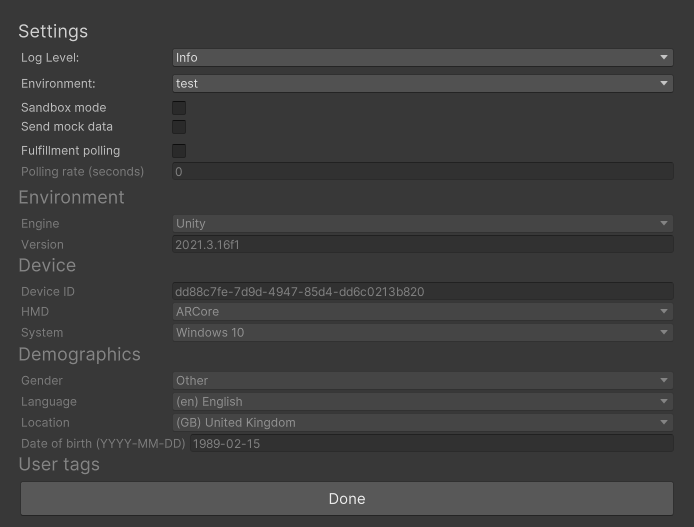
Most settings here can be ignored for the Alpha, the one interesting setting is Fulfillment polling. If you check this and set a value for Polling rate every time the rate time is hit, Beam will check for new content. This lets you update content whilst the experience is running rather than when it starts or restarts.
The other lets you send mocked data when a user starts the session, but this won't be useful in the Alpha.
In the full version you can use the details in the mock data to decide what content to show certain groups of users. For example you could show differently localized content per country or per age group. User tags will let you custom group your users and send content based on that, for example Top performing player or Premium subscriber
#
Beam manager
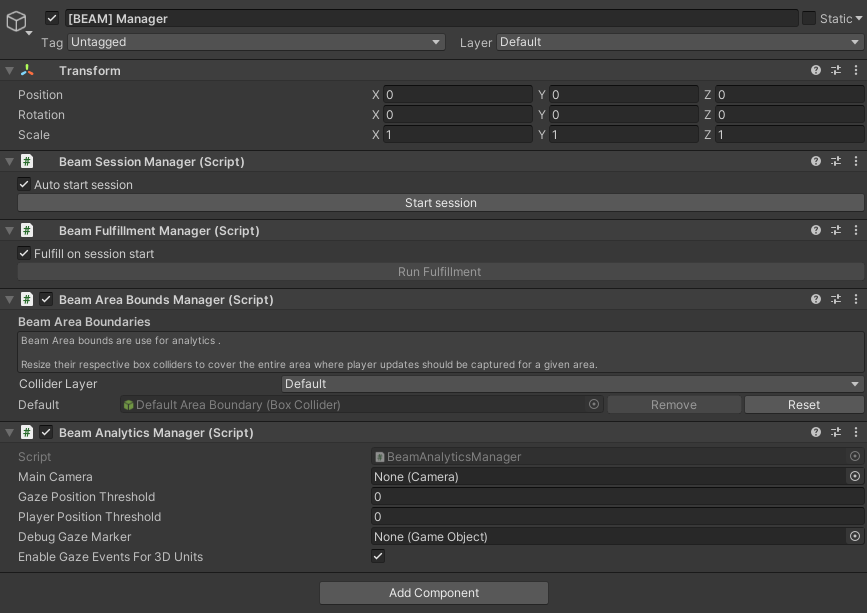
This Game Object is automatically added to your scene when you add Beam and controls the core runtime functions
#
Beam Session Manager
This script sends the start session event when your experience is started. If you uncheck the Auto start session box you can programatically start the session via BeamClient.StartSession or by clicking the button in the inspector.
#
Beam Fulfillment Manager
This script is responsible for actually fetching the Assets to fulfill all of your Slots. Like with the session manager you can disable Fulfill on session start to control fulfillment programatically via BeamClient.StartAutomaticFulfillment()
#
Beam Area Bounds Manager
This script controls the area where we record analytics (not in the Alpha). The restriction improves performance and allows us to limit the amount of network traffic.
Analytics are disabled for the Alpha, if you're interested please send us an email at hello@beam3d.co and we can get something
#
Beam Analytics Manager
This script controls how we send and detect analytics events. It lets you assign a camera if you don't use the Main Camera tag which will be responsible for gaze and positional event tracking. Gaze tracking gives you analytics when a user looks at one of your slots, the threshold sets how sensitively we track the movements. The player position tracks when the player moves around your environment with the threshold controlling the sensitivity.
Analytics are disabled for the Alpha, if you're interested please send us an email at hello@beam3d.co and we can get something
#
Beam Unit Scripts
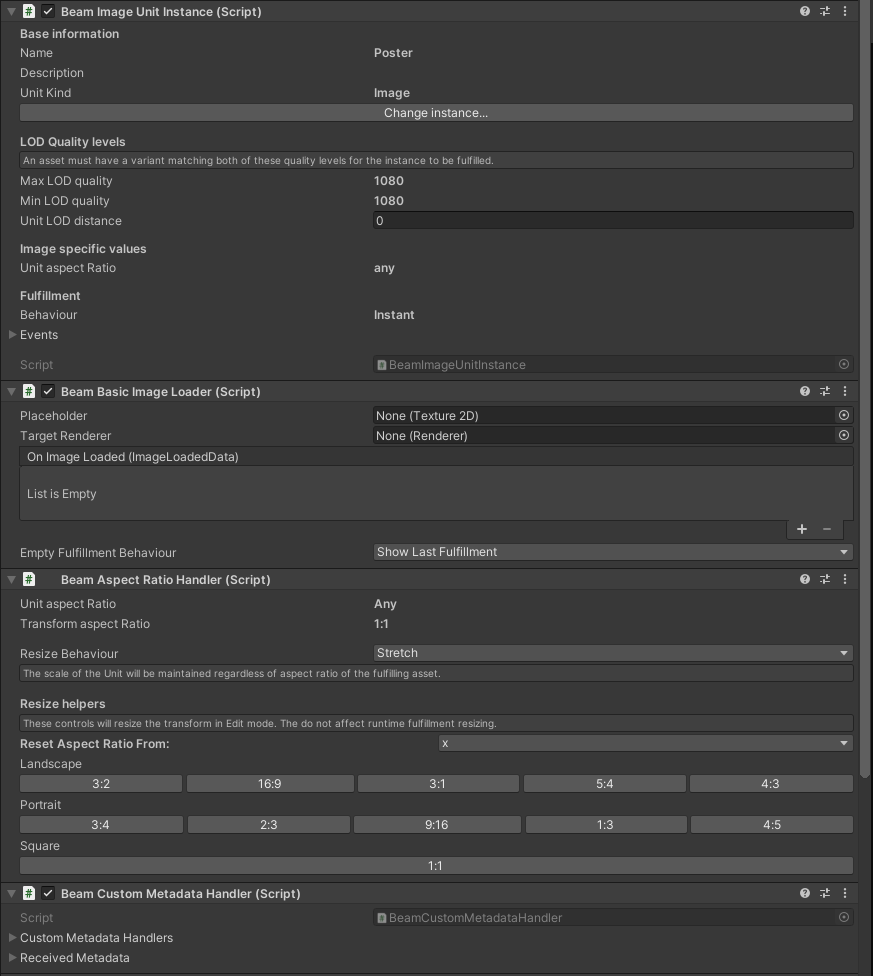
This is an example of what the scripts look like when you add a Slot from the UI. The Beam Image Unit Instance script lets you re-assign the Slot to another (or you can use this if you decide to manually add this script to your own Game Object).
The Beam Basic Image Loader lets you set a placeholder texture to show if they unit is fulfilling or does not get fulfilled and also lets you asign any Renderer component to render the fulfilled texture into. You could use this to retexture another object for example rather than simply displaying an image.
Each asset type has a different loader setup but anything with the word Basic in the name is meant as a guide for you to write your own loaders. They'll work but are only the tip of the iceberg in terms of what you can do!
The Beam Aspect Ratio Handler decides how to handle images that don't match the aspect ratio of the plane you are trying to display it on and hopefully will be quite self explanatory, just experiment!
The Beam Custom Metadata Handler will allow you to handle custom data sent down with Assets
Custom Metadata is not supported in the alpha, if you're interested just drop us an email at hello@beam3d.co